Feeds:
Posts
Comments

Argh. Obnoxious people outside your apartment at 2AM… welcome to college I guess. It was all fun and games when I was a freshman but now that I’m old… haha.

School has resumed and as usual, my brain is in sluggish mode because of the break. I have to force myself back into a healthy sleeping routine and turn my “academic” brain back on. 🙂

So I made a quick and easy lunch to make life a little easier for me~

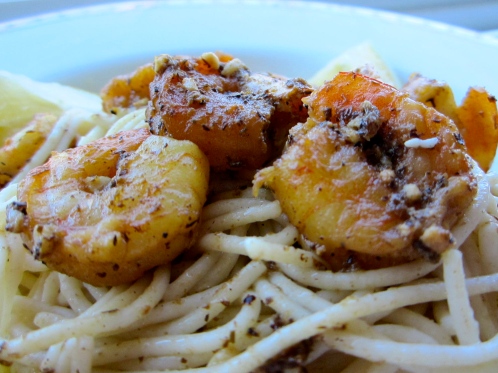
Shrimp Pasta with Lemon

I’m sure we all have our fast meals that we fall back on. Pasta is one of those things for me. Unfortunately my husband hates pasta so I don’t actually eat it that often. But when I get to eat alone… 😀 I’ve been on a seafood kick these days, so I made a shrimp pasta with lemon. Quite delicious!

Shrimp Pasta with Lemon

Do you have a go-to meal?

Yesterday I saved up my meal for something special… the launch of Red Mango’s Spoonable and Mealworthy smoothies! Best of all, from 6/15/11-6/18/11 we can all try them for $2! First 1,000 customers get Red Mango love stickers (which my store didn’t have, unfortunately).

Red Mango / Spoonable and Mealworthy Smoothies Promotion

Red Mango / Spoonable and Mealworthy Smoothies Promotion

I love Red Mango. When they finally opened a store on campus, I was super excited. I would literally drive by the store on the way to work everyday while they were preparing to open and squee from excitement. The first day they opened, I was there. It was history, and I was a loyal Red mango goer after that.

I started being interested in frozen yogurt (or froyo) when I was looking for a tasty exchange for the normal high calorie ice cream shops that I frequent with my friends during our study breaks. I really love fresh fruit, so the idea of a low-calorie frozen yogurt and fresh fruit toppings just hit the spot!

Red Mango / Love Sticker

Red Mango / Love Sticker

One of my good friends that I meet often is extremely lactose intolerant, so I wanted to include her as well. Thankfully, Red Mango has froyo that is totally safe for her to eat, and she doesn’t have to worry about being sick later. I checked out some pamphlets by the cashier talking about the health benefits of their frozen yogurt with GanedenBC30, a “natural supplement that can help support your digestive health and maintain your immune system.” I have to say, my transition from high calorie ice cream to frozen yogurt has been more than easy. 🙂

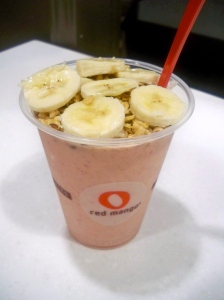
Yesterday, I dragged K to the Red Mango to check out their new smoothie offerings. A lot of yummy options! I tweeted the CEO of Red Mango about my confusion over the flavors, and he surprisingly replied advising me to try his favorite, strawberry banana. So I decided to give that one a try. I like that the CEO is so hands on with the fans of Red Mango. 🙂

Red Mango / Spoonable Strawberry Banana

Red Mango / Spoonable Strawberry Banana

It was a good choice. The smoothie was delicious! The only downfall I can see is that it weighs in at a whopping 600 calories, which truly is a meal. The other Spoonable Smoothies were around the 400 range, which is a much better number. Next time, I will give them a try. K was pretty neutral on his Spoonable Smoothie, and didn’t like the fact that granola was blended into the smoothie, since he isn’t really a big granola fan.
Red Mango / Spoonable Strawberry Banana

Red Mango / Spoonable Strawberry Banana

Along with the $2 smoothie promotion, they also were offering Red Mango “Love” stickers to the first 1,000 customers who participated in the promotion. My store didn’t seem to be up to date with everything and they weren’t even advertising the promotion. I called in advance to make sure they were running it, and after the girl inquired with the manager she told me that they were. I was totally bummed that they didn’t have any stickers to give out, as I was looking forward to representing my Red Mango love.

All in all, I would definitely give two thumbs up for their new line of smoothies! It’s a great deal, too. Check it out until Saturday to try them if you are unsure. It is an easy, tasty and nutritious way to get in a quick lunch or dinner if you don’t have time. Sometimes I’m not really in the mood for a big meal and something like this is perfect.

Tomorrow I was supposed to start babysitting a second child. Unfortunately, he has come down with a contagious rash so his father will be keeping him for the week. I feel like I was dreading him coming this week so that happened. I was just so overwhelmed with us moving our apartment that I couldn’t imagine getting all of the stuff I needed done with two toddlers. One is daunting enough! I sometimes wonder how parents with two children of similar ages go to public places without having at least one panic attack. One has to run one way and the other must run in the opposite direction! Quite frightening.

I decided to make a treat for the little boy I watch, Z. He has been really good this week while we were out and about. A parent even complimented him for playing so nicely in the library the other day. I have to admit, Z’s personality is really laid back and pleasent, so watching him is easier than other children. He doesn’t use temper tantrums to get what he wants, which is good. There is nothing worse than being stuck in a public place with a screaming child because they did not get something they wanted. Half of the people giving you a dirty look, the other half convinced you are beating your child or doing something wrong. Thankfully, his mother is very consistent in her dealings with him, so he knows that crying will not get a desirable result.

During this summer, we ride the bus often and I am surpised at the mixed reactions I get when people see me walking along with a toddler. Many people are shockingly rude and inconsiderate. At times I feel like a real nuisance to them, and like I do not belong there. I hate this feeling, especially when it is in places for the public, such as riding the city bus. It makes me sad to see a person who is very anti-child. I can’t imagine how one could have this attitude, especially since we were all kids once and should have some experience around kids ourselves. I suppose they will have a wake up call when they have kids themselves.

I’m not trying to be totally negative. Even though there are many negative reactions to our presence (I think it is exaggerated here because we live in a college town and mostly students ride the bus), there are many smiles and welcoming looks when we are spotted as well, and I always appreciate those. I try to bottle those feelings when I deal with unpleasant people.

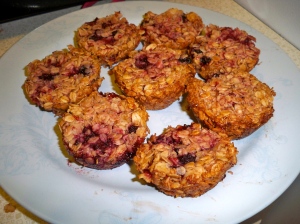
Oat Berry Cookies / louisabellissima

Oat Berry Cookies / louisabellissima

Tangent, there. I wanted to make a treat for Z to snack on in the days to come. I found a nice recipe for berry cookies, an oat based recipe by louisabellissima. It has simple ingredients that I had on hand, easy preparation, and a short baking time. The taste was really good. Unfortunately, I think they needed more baking time. Although I baked them for the time stated, they did not hold together very well. Next time, I will lengthen the baking time.

Nevertheless, this recipe is awesome for kids to snack on. I’m fond of oats and this is a nice way to include them.

Oat Berry Cookies / louisabellissima

Oat Berry Cookies / louisabellissima

Ingredients:

  • 175 g butter
  • 125 g brown sugar
  • 50 g honey
  • 350 g rolled oats
  • fresh or frozen berries
  • a muffin tray
  • paper liners

Directions:

Melt butter, sugar and honey in a small pot on the stove over low heat and stir until dissolved. Combine with the rolled oats in a large bowl. Add the berries and distribute the mix into the muffin tray. You can use a small bottle or a glass that fits into the moulds to gently press down the contents. It works best with frozen berries, with fresh ones you have to be careful not to squash them.

Bake at 180 degrees for about 20 minutes. Once they are baked and have cooled you can take them out of the muffin cups and they will have a beautiful shape. However, if you use colourful muffin cups and leave them in there, it will make them even more appealing to your children and they will  look much nicer in their lunch boxes.

Yesterday, I didn’t really feel like cooking. Finally hit a lazy day. I wasn’t even able to attempt to look up recipes. I knew I wasn’t going to keep going at the rate I have these last few weeks. I have been trying to do it all!

Occasionally I get bouts of energy with an urge to be very productive. I usually end up cleaning the house really well or doing some task that I had been putting off. It is a good thing, but exhausting!

The perfect solution: quiche! An egg dish that you can basically customize with little room to mess up.

Here is my version of quiche, it was delicious!

Crustless Vegetarian Pea, Green Chili, and Carrot Quiche

Crustless Vegetarian Pea, Green Chili, and Carrot Quiche

Ingredients:

  • 1 cup frozen peas
  • 1 carrot, shredded finely
  • 1 4oz can of green chilies
  • 1/2 cup cheese
  • 4 eggs
  • 200ml half and half
  • pinch of cumin
  • salt and pepper to taste

Directions:

Whisk eggs, half and half, cumin, salt and pepper together in a medium bowl.

Arrange filling ingredients in pie pan. Pour egg mixture on top of the fillings and let it set. Bake at 350 degrees for around 30 minutes or filling is set.

Calzones. They seem too difficult to make, right? Not really. My laziness speaking once again! Thankfully I do have days when I feel like doing something ‘crafty’, so I find a nice recipe like this one that is still easy, but I can walk away with a very satisfied feeling after completion.

These were good. My husband really enjoyed them. We both felt that there needed to be more filling. You can see in my picture that most of the bubble inside was empty.  Which was really, really sad because more of a good thing is always right! Next time I will definitely double the filling.

Calzone - mybakingdom
Calzone Dough by  mybakingdom

Ingredients:

20 ounces (4 cups) bread flour (all purpose will work too)
1 1/2 teaspoons salt
2 1/4 teaspoons (one envelope) yeast
2 tablespoons olive oil, plus more for drizzling
1 3/4 cups warm (about 100 degrees) water
Pinch of herbs (optional)

Directions:

Place all of the ingredients in a large bowl or the bowl of a standing mixer with the dough hook attached. Combine the ingredients until a dough forms. If mixing by hand, turn dough onto a floured surface and knead for 8 to 10 minutes, or until smooth and elastic. If using a mixer, continue kneading on medium speed for 8 to 10 minutes, or until smooth and elastic.

Place the dough on a large bowl, cover, and allow to rise for 30 minutes to an hour, or until doubled. When the dough is doubled, poke and press the dough to release some of the air. Next, flatten the dough into a 10- to 12-inch circle.

Once all of the filling is in place, brush the edges of the dough with water and fold the dough over until the edges meet. Use your fingertips to press the edges together all the way across the seam. Once again, brush the edge of the calzone with water. Now fold the edge of the calzone over again. Be sure to pinch the corners together really well, as that”s where the majority of the leaking is likely to take place. Feel free to put some pizza sauce and cheese on the top of the calzone.

All four of these calzones fit onto a baking sheet, and they work best when the sheet is lined with parchment paper. You can bake them directly on the cookie sheet, or slide them onto a hot pizza stone. Bake the calzones at 375 degrees for 30 minutes. Allow to cool for 10 minutes or so before serving.

Hmm hmm! Chicken curry soup? Yes please!

I wasn’t feeling like this recipe was going to be mind-blowingly delicious, but it was. I was really surprised, and maybe because I had such low expectations, but I was really happy with the meal. My husband thought likewise. I almost didn’t try this recipe because I was too lazy to poach the chicken, but I sucked it up and did it anyways. I’m glad I did!

Although the ingredient list seemed long, it didn’t take very long and it is mostly just all of the spices that you need to measure out.

Filling, healthy meal once again. I’m not doing too bad on my healthy eating goal. 🙂

Try this! You won’t regret it. Many thanks to Simply Delicious for providing this recipe on her website. 🙂

Chicken Curry Soup / Simply Delicious

Chicken Curry Soup by Simply Delicious

1kg chicken pieces, poached with skin and bones removed and meat shredded
1 large onion, finely chopped
2 large carrots, peeled and finely chopped
1 celery stalk, finely chopped
3 garlic cloves, crushed
1 tsp crushed ginger
1 tin chopped tomatoes
1 tbsp ground coriander
2 tsp ground cumin
2 tsp paprika
2 tsp turmeric
1/2 tsp each nutmeg and cloves
1 bay leaf
1 tsp crushed chillies / 1 red chilli, finely chopped (optional)
1 tsp sugar
1.5l chicken stock
100ml cream
salt & pepper to taste

What to do:

  1. In a large pot, fry the onion, carrots and celery in a bit of oil until soft and translucent.
  2. Add the garlic and ginger and fry for another minute before adding the tomatoes and spices. Allow to cook for 2 minutes.
  3. Add the sugar and stir into the spicy mixture.
  4. Add the shredded chicken and stir to coat the chicken in all the spices and vegetables.
  5. Carefully pour in the stock and allow the soup to come up to a simmer. Simmer gently for 10 minutes until the vegetables are cooked and the soup looks rich and fragrant.
  6. Add the cream and season to taste.
I can’t say enough how good this recipe ended up being. It was also really good the next day.

My bookmarks are a mess. I stalk food blogs for yummy ideas really often, and in the process end up with a bagillion bookmarks that clutter my browser and are of no use. It was really annoying, not to mention counterproductive, sigh.

Oh but then… I stumbled upon the best thing since sliced bread for bookmarking recipes! Life changing I tell you.

del.icio.us delicious

Oh yes, del.icio.us! I was first introduced to del.icio.us through a technology class that was required for my education major. I used it mostly for compiling teaching resources. One day it dawned upon me… it was perfect for recipe bookmarking! Not only does it store them on the website, but you can tag them.

This is super awesome for me, because I get really annoyed when I read through a recipe, get excited, and then realize I am missing one or two ingredients from the list. Big letdown. To deal with that problem, I tag every significant ingredient in the recipe. If I want to make a meal with chicken that night, then I can browse through all of my chicken recipes and know right away if I have everything needed from the tags. No need to read through tasty posts to be let down later. It is a really handy and useful way to store recipes.

If you haven’t started using del.icio.us already, I would highly recommend that you try out this awesome service! I already mentioned that I have another account for storing teaching resources, and I believe that del.icio.us can be used for other bookmarking needs as well. Especially if your browser likes to “eat” your bookmarks, which mine does occasionally!

Oh my gosh! Time sure flies. I keep telling myself to update with my culinary journey here (because yes, I’m still cooking!) but never find the time. This week I have been trying to use as much time as I can cleaning my house, and planning dinner during naptime. It has worked out quite well!

I wanted something quick and easy yesterday, so I decided on cheeseburgers and french fries. I wanted to try something a little different, so I combined two hamburger recipes. I thought it was hilarious and awesome that one of the recipes came from a website called The Naptime Chef. How fitting. 🙂
The combination turned out lovely, and was really easy to prepare, as most hamburgers are. A classic, delicious, and easy to prepare food. Sometimes I just don’t have time to prepare an elaborate dish before my husband comes home from work.

Juicy Beef Hamburgers with Parsley Chive Butter by Five Paper Dolls and The Naptime Chef
Hamburger:
500g beef mince
1 small onions finely diced
1 tbsp dried mixed herbs
salt and pepper, to taste
2 eggs
¼ cup plain flour
5 tbsp tomato paste
oil, for frying pan

Parsley-Chive Butter:
5 T. good quality unsalted butter
1 T. chives, finely chopped
1 T. parsley, finely chopped

Directions:
1. Mix all the ingredients together in a large bowl, with your hands until the beef has combined with the ingredients and sticks together well.
2. In a food processor or mini-chopper, add the butter, chives and parsley. Pulse until well combined and slightly softened.

3. Take each hamburger patty and make a well in the center. Form a ½″ ball of herb butter with your hands and press it into the well. Gently fold over the outer edges of the burger to cover the butter completely and seal it in. Repeat with remaining patties.
*At this point uncooked burgers will last, tightly wrapped, in the fridge for up to 6 hours.

4. Place in a pre-heated frying pan with oil. Cook each side on a low-medium heat for approximately three minutes each side. If the pan is too hot, the outside of the burger will be burnt and the inside will be undercooked.


It is the weekend and my husband is still out of town working. I had a lot of plans but instead, I’m being lazy with no one around. I’m currently looking at my bedroom floor with dread. I feel like I just tidied it up a few days ago, and it has now returned to being extremely messy again. I really need to kick the habit of throwing things on the floor.


Yesterday I got the urge to bake once again. I also had been having a craving for pancakes the last few days, but I’m out of milk so that was a no go! Then I chanced upon this recipe… lemon! Ricotta! All things I have in my pantry. And best of all… no milk required! I honestly decided to do this around midnight, so the 20ish minute bake time definitely helped me choose this one. It was really delicious, and the lemon flavor really shined through and gave something special to the pancake. You should check it out and give it a try.

Lemon Ricotta Soufflé Pancakes by Sweet Savory Planet
Ingredients:
3/4 cup (75 g) of all purpose flour
1/3 cup (63 g) of sugar
1/2 teaspoon salt
4 eggs separated
4 tablespoons of unsalted butter (2 melted and 2 for the pan)
2/3 cup (165 g) of ricotta, whole or part skim
1/4 cup (60 ml) of lemon juice
zest of a lemon
1/2 teaspoon of vanilla
1/4 cup (42 g) of fresh or frozen berries
Turbinado or raw sugar for sprinkling over the top
Confectioners sugar for a light dusting
A light maple syrup or Lyle’s golden syrup
Directions:
Preheat the oven to 375 degrees and preheat a 10-inch iron skillet or saute pan.
Mix flour, sugar and salt in a bowl.
Mix eggs yolks, drained ricotta, butter, lemon juice, zest vanilla in a large bowl and mix well.
Place the separated egg whites in a mixing bowl and whisk to stiff peaks.
Add the flour mixture to the wet mixture and combine well. Add a small dollop of the egg whites and mix in to lighten the batter. Add the remaining egg whites and fold in with a spatula until combined.
Remove the pan from the oven and put 2 tablespoons of butter it it. When the butter has melted add batter, sprinkle a few berries across the top and sprinkle on about a tablespoon or 2 of turbinado sugar. Return the pan to the oven. Bake for 20 to 25 minutes. When the pancake is puffed and lightly browned on top it is ready.
Serve with a light sprinkling of confectioners sugar and serve with syrup of choice.

Another exhausting day with a two year old. Alhamdulillah though, what a difference a good nights sleep makes!

I had time to actually cook lunch today. I made spaghetti with turkey meatballs. It was really yummy. I bought a few pounds of ground turkey a few days ago in hopes of adding some diversity to my meals. I like turkey, but honestly I usually only eat it during thanksgiving.
This was really yummy. I was happy to see that carrots were inside. I always buy carrots and they end up going bad because I rarely cook with them and I don’t really like the taste of carrots by themselves. I gave it to Z, the two year old I am babysitting, and it was a hit. He gobbled it up and told me it was yummy. 🙂 A keeper for sure.

Easy Turkey Meatballs by The Taste Traveller
Ingredients:
  • 1 lb/500 g ground turkey (approximately)
  • 2 tablespoons (30 ml) olive or vegetable oil
  • 2 tablespoons (30 ml) flax seeds (about 1.5 tablespoons whole seeds). I like to leave some of the seeds whole for added texture.
  • 1 cup (250 ml) fresh bread crumbs (about 2 slices of toast)
  • 1/2 cup (75 ml) onion (about 1/2 medium sized onion), finely chopped
  • 1/2 cup (75 ml) carrot (about 1/2 medium sized carrot), finely chopped
  • 2 cloves garlic, finely chopped
  • 2 tablespoons (30 ml) dried oregano
  • 2 tablespoons (30 ml) dried basil
  • 1 tablespoon (15 ml) fresh rosemary, finely chopped
  • juice of 1 lemon
  • 1 egg
  • 1/4 cup (60 ml) parmesan cheese, freshly grated
Directions:

Put the ground turkey in a large mixing bowl. Take a fork or spoon and break it up.

Finely chop the carrot, onion, garlic. Add to the bowl with the ground turkey

Toast two slices of bread and grind in a food processor or coffee grinder (I have one I use just for this and flax seeds). Add to the bowl with the ground turkey, carrot, onion and garlic.

Grind the flax seeds. Add to the bowl with the other ingredients

Chop the rosemary. Add this and the other herbs to the bowl with the other ingredients.

Grate the parmesan cheese and add to the bowl with the other ingredients. .

Squeeze the juice of one lemon into the bowl with the other ingredients.

Add the egg to the bowl with the other ingredients. .

Add a pinch of salt and a few grinds of fresh pepper to the mixture.

Take a fork or spoon and mix all of the ingredients together. When well mixed, form the mixture into little balls with your hands. I formed mine into about 1.5 inch (3 cm) balls – they would be great slightly smaller or bigger I am sure.

In a suitably sized saucepan (non-stick or well-seasoned cast iron), over medium high heat, with the olive oil or vegetable oil added to the saucepan, lightly brown the meatballs all over and then cook until cooked through. I cut one in half to check for doneness. I also find it helps to keep them moist if you add a splash of water and cover the saucepan to basically steam them until cooked (after browning).

Serve as an appetizer or with your favourite pasta dish.